Hermes Environment Usage Guide
Virtual Machine Environment Preparation
Apply for a virtual machine environment and obtain the following information:
- Virtual Machine IP Address: [Sent via email]
- Login Username: [Sent via email]
- Login Password: [Sent via email]
Virtual machine environment agent management:
agent-ctl — unified start/stop control for the Hermes / DeepSeek Harness dual-stack
agent-ctl status                    # Overview of both stack statuses
agent-ctl start   hermes|dsh|all    # Start the specified environment
agent-ctl stop    hermes|dsh|all    # Stop the specified environment
agent-ctl restart hermes|dsh        # Restart the specified environment
agent-ctl boot    hermes|dsh on|off # Toggle auto-start on boot
Hermes Environment Login
On first login, enter the following address in the browser address bar (Chrome browser is recommended):
http://<VM-IP>:8787
For default login credentials upon first login, please check your email or consult the HPC administrator.
Web UI Login Password Change
After logging in, it is recommended to change the default password immediately. This can be done through the Web UI interface or the command line.
Method 1: Change via the Web UI interface
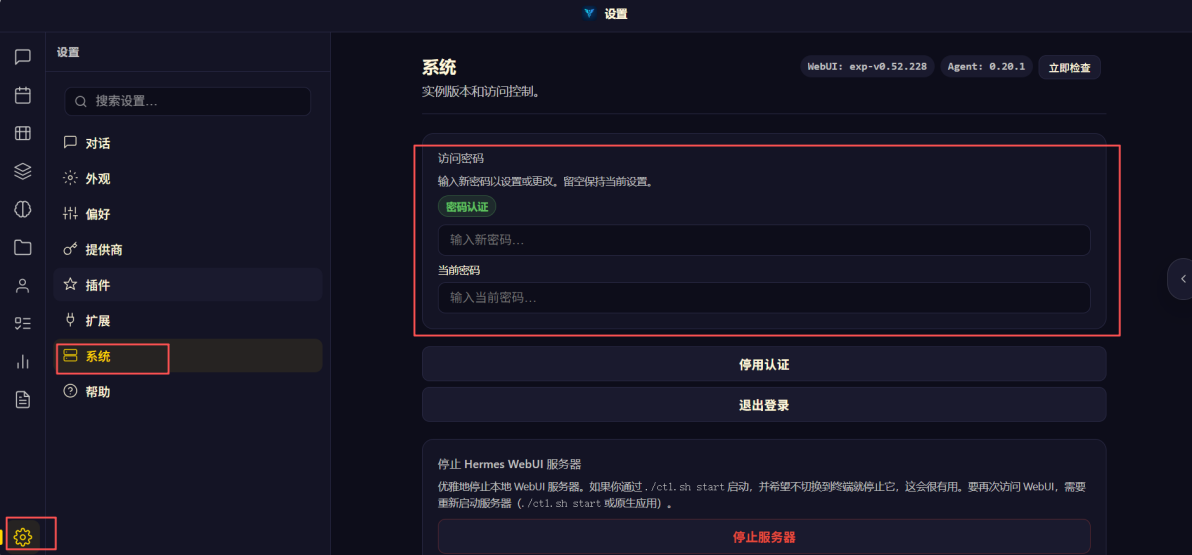
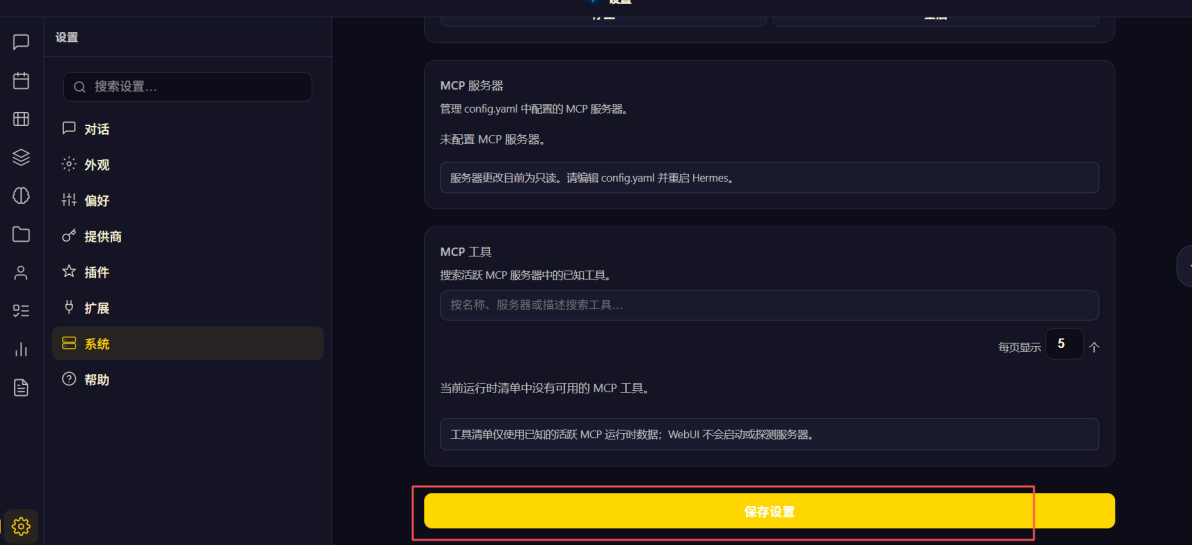
Click 「Settings」→「System」 in the bottom left corner in order, enter the new password and old password on the right, then click 「Save Settings」 at the very bottom to complete the password change.
Method 2: Change via the command line
After logging into the virtual machine environment, run the following command:
sudo hermes-webui-pass "New Password"
✓ After resetting, the old password becomes invalid immediately and the new password takes effect immediately.
Add a Custom Model Provider
After entering the Web UI interface, configure the custom model by following these steps:
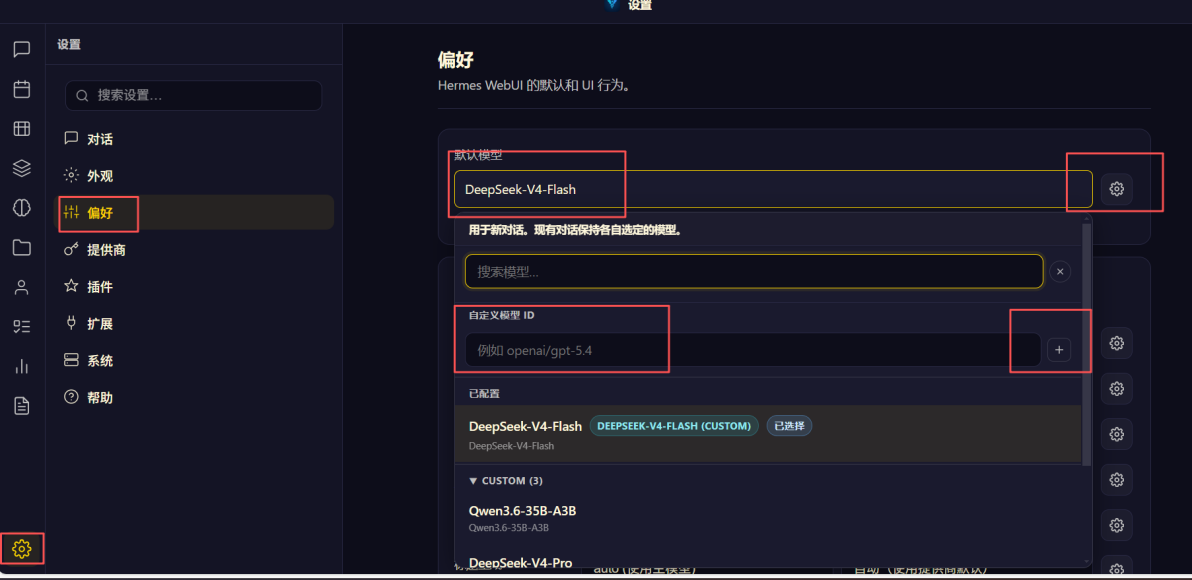
- In order, click 「Settings」→「Preferences」→「Default Model」→「Custom Model ID」 in the bottom left corner
- Enter the Model ID, then click the 「+」 on the right
- Click 「Advanced Options」 to the right of 「Default Model」 to configure the 「Base URL」 and 「API Key Override」
- Fill in the obtained Api-url and Api-key information
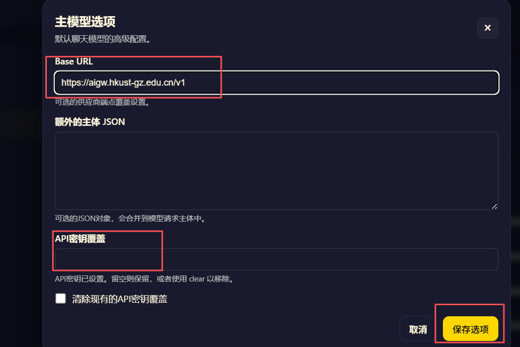
A private model service on campus has already been integrated.
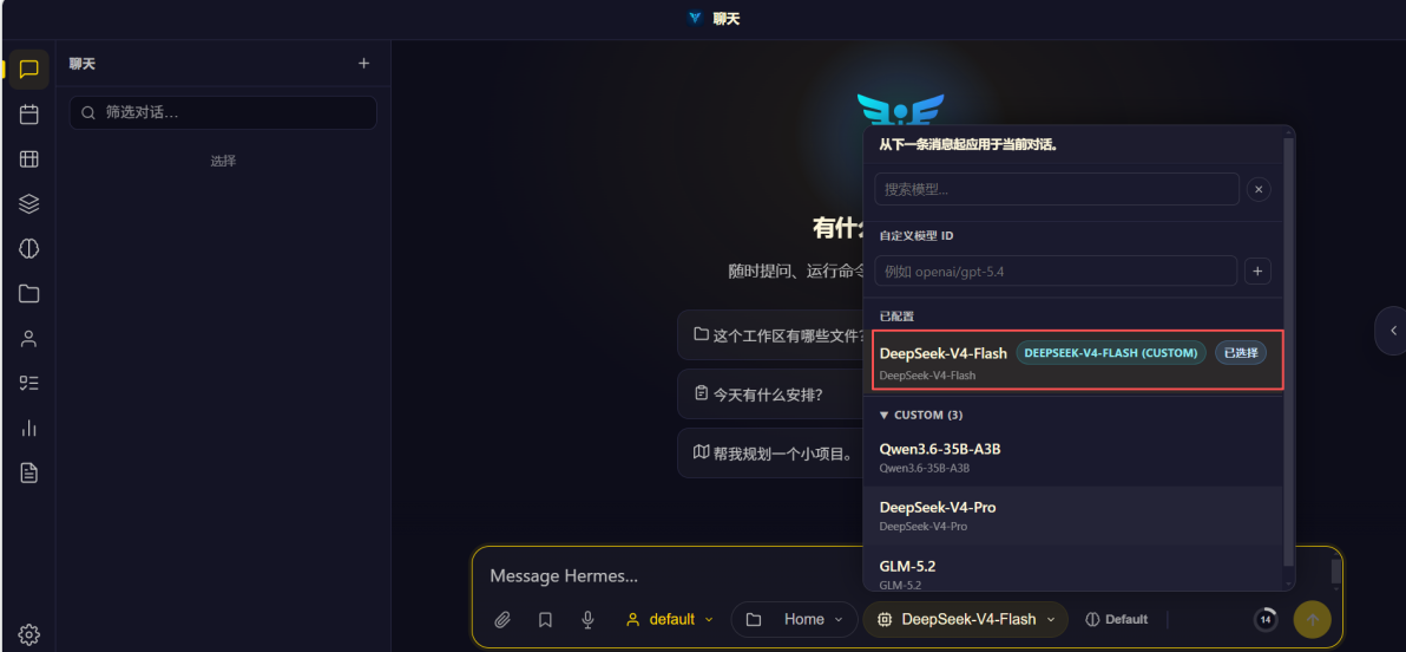
Start Chatting
After entering 「Chat」 in the top left corner, click the bottom area of the Web UI to select the configured default model, and you can start chatting.
Advanced Configuration Reference
Why you must select custom (practical pitfalls encountered)
-
openai-apiis the official OpenAI provider. It only recognizes theOPENAI_API_KEYenvironment variable. The Base URL / API Key filled in the WebUI will be completely ignored, and it will forcibly connect toapi.openai.com. -
If you select the wrong option, chatting will report an error:
Provider 'openai-api' is set in config.yaml but no API key was found.
Set the OPENAI_API_KEY environment variable. -
You must select
custom: In this case, the Base URL / API Key / Default Model all take effect, and chatting connects directly to your model gateway (chat_completionsmode). -
✓ For private / self-hosted / campus AI gateways and other OpenAI-compatible endpoints, always use the
customprovider.
Configuration file method (equivalent, for administrators)
Configuration file path: /home/hermes/.hermes/config.yaml (bind-mounted into the webui container; changing the host copy takes effect immediately)
model:
  provider: custom
  default: "DeepSeek-V4-Flash"
  base_url: "https://aigw.hkust-gz.edu.cn/v1"
  api_mode: chat_completions
  api_key: "sk-your-real-api-key"
After modification, run the following commands to make the configuration take effect:
cd /home/hermes/hermes-stack && docker compose restart hermes \
  && docker compose restart webui
Interface Navigation (left panel)
| Panel | Purpose |
|---|---|
| Chat | Chat with the model: create/switch sessions, with Agent capabilities (Files, Shell, Tools) |
| Agent | View/manage Agent instances and sessions |
| Skills | Browse available skills (e.g. claude-code / codex / computer-use, etc.), enable/disable them |
| Profiles | Manage profiles (e.g. default), switch as needed |
| Kanban | Ready / Blocked / Done / Archived lanes, create/drag task cards |
| Settings | Language, default model, password, workspace, etc. |
The panels are tab-based: click the left-side icons to switch. Directly entering /skills, /profiles, /kanban in the address bar will return {"error":"not found"}, which is normal. Please use the left-side icons to enter.
Files / Workspace
- The default workspace is
/workspace(mapped to the host/home/hermes/workspace), and sessions can read and write to this directory. - While chatting, you can use
@to reference files or let the Agent create/modify files within the workspace.
Frequently Asked Questions (FAQ)
| Question | Description |
|---|---|
| Web page won't open / EIP not reachable | Contact the administrator to confirm whether the security group allows inbound TCP 8787; verify the service itself on the VM with curl http://127.0.0.1:8787/ |
| Login page shows English | Switch the language to Chinese in the top right corner; or ask the administrator to change language: "zh" in settings.json |
| Chat reports a provider error | See Advanced Configuration Reference; the provider must be set to custom |
| No reply from chat | Check whether the model service is reachable and whether the API Key is correct |
| Kanban/Skills panel keeps loading | Click the left-side panel icon to re-enter |
| Login fails after changing the password | The password hash is irreversible; ask the administrator to reset it with sudo hermes-webui-pass <New Password> |
Official WebUI Usage Guide Links
This WebUI is based on the open-source project nesquena/hermes-webui (image v0.52.228). The official documentation is in the repository's docs/ directory. The links below are the official authoritative guides and match this deployment environment (three-container Docker mode).
Official homepage and documentation
| Content | Link |
|---|---|
| Official installation/setup page (main entry) | https://get-hermes.ai/setup |
| Hermes Agent official documentation | https://hermes-agent.nousresearch.com/docs/ |
| Hermes Agent source repository | https://github.com/NousResearch/hermes-agent |
| WebUI source repository (including all official documentation) | https://github.com/nesquena/hermes-webui |
Official WebUI usage guides (repository docs/)
| Document | Link |
|---|---|
| First-run wizard (onboarding) | https://github.com/nesquena/hermes-webui/blob/master/docs/onboarding.md |
| Docker deployment guide (three-container reference) | https://github.com/nesquena/hermes-webui/blob/master/docs/docker.md |
| Advanced chat settings (session title/context) | https://github.com/nesquena/hermes-webui/blob/master/docs/advanced-chat-setup.md |
| Remote access (external machine/Tailscale) | https://github.com/nesquena/hermes-webui/blob/master/docs/remote-access.md |
| Troubleshooting | https://github.com/nesquena/hermes-webui/blob/master/docs/troubleshooting.md |
| Workspace Git control | https://github.com/nesquena/hermes-webui/blob/master/docs/workspace-git.md |
Security and Compliance Reminders
- Initial default password: For default login credentials upon first login, please check your email or consult the HPC administrator. Please change it yourself after logging in.
- Key confidentiality: Do not disclose your API Key to others; do not upload sensitive keys/passwords in chats.
- Network scope: Port 8787 is allowed by the administrator with source restrictions as needed; if remote access is not required, you can ask to tighten the security group.
- Usage boundaries: The WebUI has file read/write and Agent tool capabilities. Please comply with your organization's data security and compliance requirements.