Code Development
The code development sub-module closely adheres to user habits, supports interactive modeling in the form of code command lines, and allows for the upload of training code through the WEB page. Users can select the corresponding dataset and script for code training.
The price of queued resources for code development is billed at the minimum tier. Reference: Resource Pricing (Phase III)
Create a Development Project
Path: Artificial Intelligence --- Code Development and Training --- Code Development
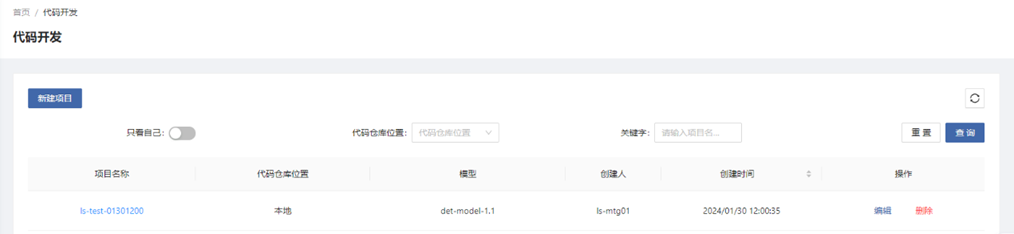

Code Source: Select local (External code repositories may not be accessible due to network restrictions).
Secondary Model Development: If you want to develop an existing model in the model library, select the model; otherwise, no selection is required.
Development Environment (Container)
Create a Development Environment
Create a container to select an image and ACD resources to build an AI development environment. The running status of the development environment can be viewed in HPC Phase III Platform Portal --- Job Management --- K8S Jobs.

Container Image: Select the image for running the development environment from the image center.
Use Conda Environment: When enabled, the selected Conda environment will be automatically activated. This requires the image to have installed the dependent packages for the code development environment. If you want to display the Conda environment in Jupyter, install the ipykernel package in the Conda environment with the command conda install ipykernel.
Dataset: You can select a dataset on the platform, which will be mounted to the specified path after the environment is started. You can also upload it after starting the environment.
Resource Source: Select the resource pool. The default is the shared resource pool (shared by all platform users). If you apply for a dedicated machine, you can select the dedicated machine resource pool.
Number of Nodes: The nodes here refer to Pods in K8S. When the number of Pods is > 1, each Pod will be configured with the above resource specifications, and it will become a distributed running environment (requiring algorithm code to support distributed training).
Use the Development Environment
Environment Directory
After starting the development environment, the platform will generate the following persistent directories. When the development environment stops, the data in the persistent directories will still exist.
code: A local copy of the project code development directory, which is readable and writable. It will be deleted along with the project when the project is deleted.
outputs: Stores private output files of the project, which are readable and writable. Please put the output model files in this directory. When publishing the model, the files in this directory will be published to the model directory of the model package. It will be deleted along with the project when the project is deleted.
userdata: Stores private user files, that is, "My Files" in the personal space, which are readable and writable. It will not be affected when the project is deleted.
teamdata: Stores shared files of the user group, that is, "User Group Files" in the personal space, which are readable and writable. It will not be affected when the project is deleted.
sample: Sample files for inference development provided by the platform, which are read-only. If developing an inference model, you can refer to the Readme document, samples, and templates in the directory.
adhub: Stores newly added dataset files when starting, which are read-only.
models: Stores the models for secondary development imported from the model library, which are read-only.
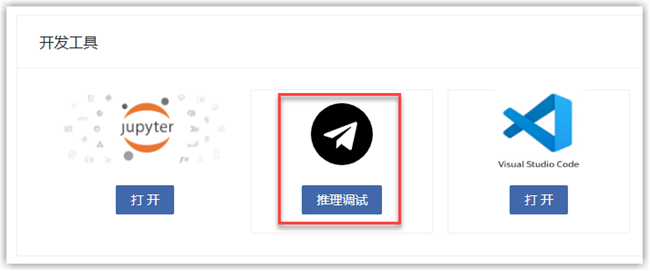
JupyterLab
After the development environment is started, if the JupyterLab environment is installed in the image, the resources will be scheduled to complete the creation of the corresponding environment, and you can start the Jupyterlab window and conduct code development in it. If distributed multi-node resources are applied for, it will run on the master node.
Open Jupyter in the development toolbar, and you can freely use the JupyterLab development environment to upload, create, edit, and delete files, and conduct code development, debugging, training, and evaluation.

VSCode
After the development environment is started, if the VSCode environment is installed in the image, the resources will be scheduled to complete the creation of the corresponding environment, and you can start the VSCode window and conduct code development in it. If distributed multi-node resources are applied for, it will run on the master node.
Open the web version of VSCode in the development toolbar, select "yes, I trust the authors", and you can freely use the VSCode development environment to upload, create, edit, and delete files, and conduct code development, debugging, training, etc.

SSH
After the development environment is started, if the SSH service is installed in the image, the resources will be scheduled to complete the creation of the SSH channel, and you can see the SSH access information. If distributed multi-nodes are added, only the access channel of the master node will be provided.
The SSH command and password are given in the interface. In the local development environment, install the SSH plugin to establish an SSH connection with the platform development environment, and you can remotely access the development environment locally.
After restarting the development environment each time, you need to reconnect.
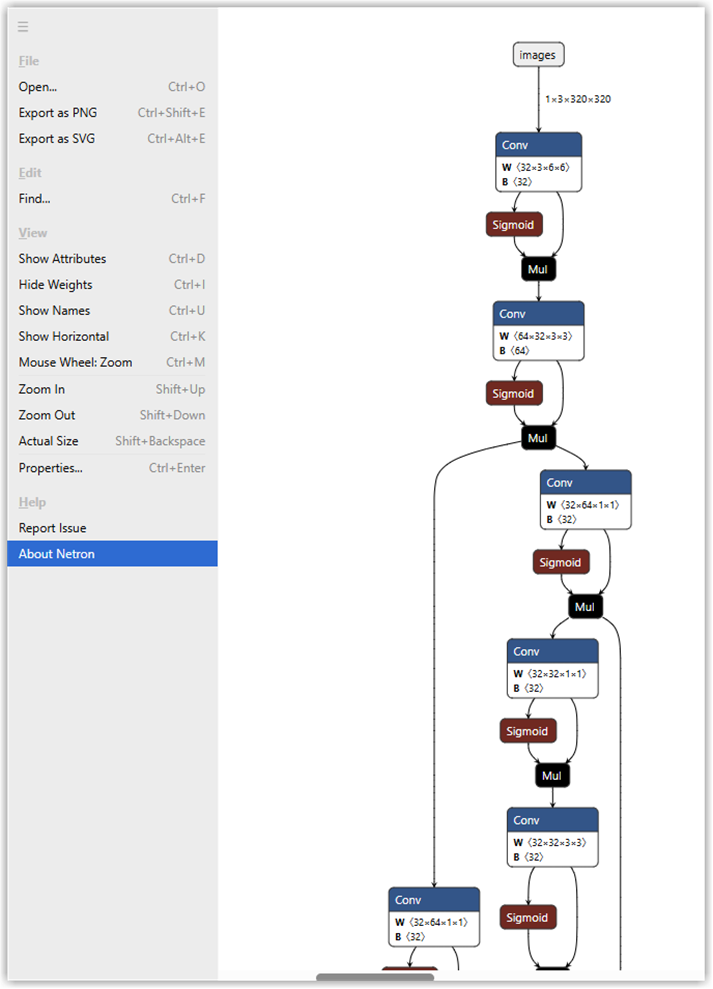
Netron
Click the Netron icon in the development tool, select the model file in the opened new window, and the network structure of this model file will be displayed in the new window.

Conda Environment
You can use the pre-installed Conda environment of the platform for code development, or configure and use your own Conda environment.
Path: Artificial Intelligence --- Basic Services --- Conda Environment
Enter the Terminal of Jupyter, and you can use the common Conda commands to view and manage the Conda environment.
View the environment list: conda env list
Create an environment: conda create -n {environment name}
Activate the environment: conda activate {environment name}
Inference Development Framework
Refer to the Readme file in the sample directory of the development environment.
Inference Test
After starting the inference service in the development environment (running the start.py file), in the inference debugging page, select the inference data type, set the listening port and access breakpoint of the inference service, upload the test file, and the inference debugging tool will send an HTTP request to the access endpoint path of the service. After the request is responded to, you can view the returned inference result.
Check whether the returned inference result is correct. If not, you need to adjust the inference service code according to the prompt information.
Configure the visualization of the inference result: If you want to graphically display the inference result on the page, turn on the visualization switch and configure it according to the status prompt.

Interactive Port
The interactive port is used to open additional ports for the development environment for other accesses. Click the "Add Port" button, enter the port name and the port number to be opened in the pop-up window, and confirm.
If distributed multi-nodes are configured when starting the development environment, only the interactive ports of the master node will be displayed.

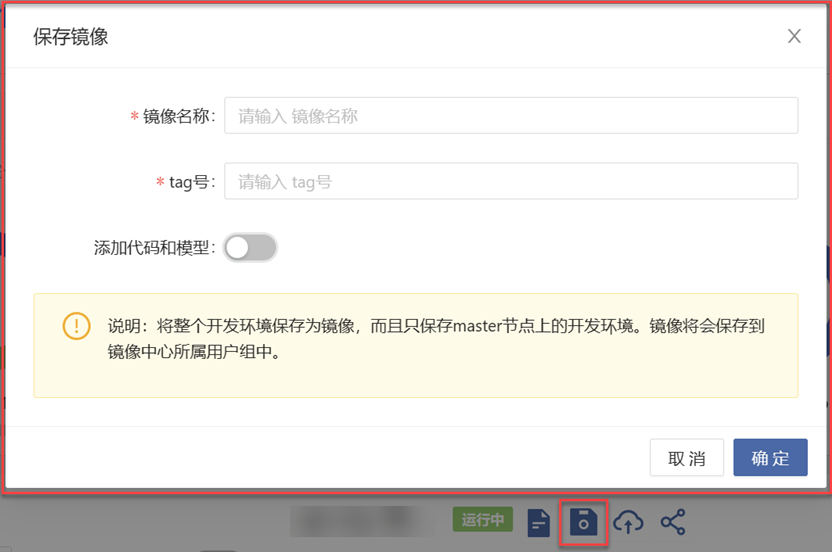
Image Saving
If software packages are installed in the development environment, including software packages installed using commands such as pip or conda, and the Conda environment, and you want to continue using these software packages when running the development environment next time, save the image in a timely manner.
Click the "Save Image" button in the project details, enter the image name and tag, and click confirm to save the image to the image center --- My Images. You can also package the code and model files in the environment into the image.
If distributed multi-nodes are configured when starting the development environment, only the master node will be saved.
Stop the Development Environment
After stopping the development environment, the resources will be released, and the data not in the persistent directory will also be cleared, including software packages installed using commands such as pip and conda.
Before stopping the environment, make sure whether the image is saved.